我参加过几次 TDD 社区的活动,每次一般都是 CodingDojo 这样的网站选择或者自定义一个题目,分组讨论测试场景,然后便从最简单的场景入手开始结对 TDD。由于时间问题,我参加的几次活动,最后都没有完全把题目做完。
这给我留下了以下印象:
- 可能是题目比较简单的原因,基本不需要设计,大概列一下场景,便开始写代码了。
- 可能目的是练习 TDD 的原因,只要代码符合 TDD 的价值,其它一切都不用考虑,比如时间资源。
- 一般从一个最简单的场景入手,任由思路如脱缰的野马,写到哪算哪。
这次,我尝试使用预先设计的方式完成一个 TDD 的题目,在此做个记录。
题目
Game of life 是英国数学家约翰·何顿·康威在 1970 年发明的细胞自动机。
给定一个包含 m × n 个格子的面板,每一个格子都可以看成是一个细胞。每个细胞都具有一个初始状态:1 即为活细胞(live),或 0 即为死细胞(dead)。每个细胞与其八个相邻位置(水平,垂直,对角线)的细胞都遵循以下四条生存定律:
- 如果活细胞周围八个位置的活细胞数少于两个,则该位置活细胞死亡;
- 如果活细胞周围八个位置有两个或三个活细胞,则该位置活细胞仍然存活;
- 如果活细胞周围八个位置有超过三个活细胞,则该位置活细胞死亡;
- 如果死细胞周围正好有三个活细胞,则该位置死细胞复活;
下一个状态是通过将上述规则同时应用于当前状态下的每个细胞所形成的,其中细胞的出生和死亡是同时发生的。给你 m x n 网格面板 board 的当前状态,返回下一个状态。
游戏体验地址:https://playgameoflife.com/
验收测试
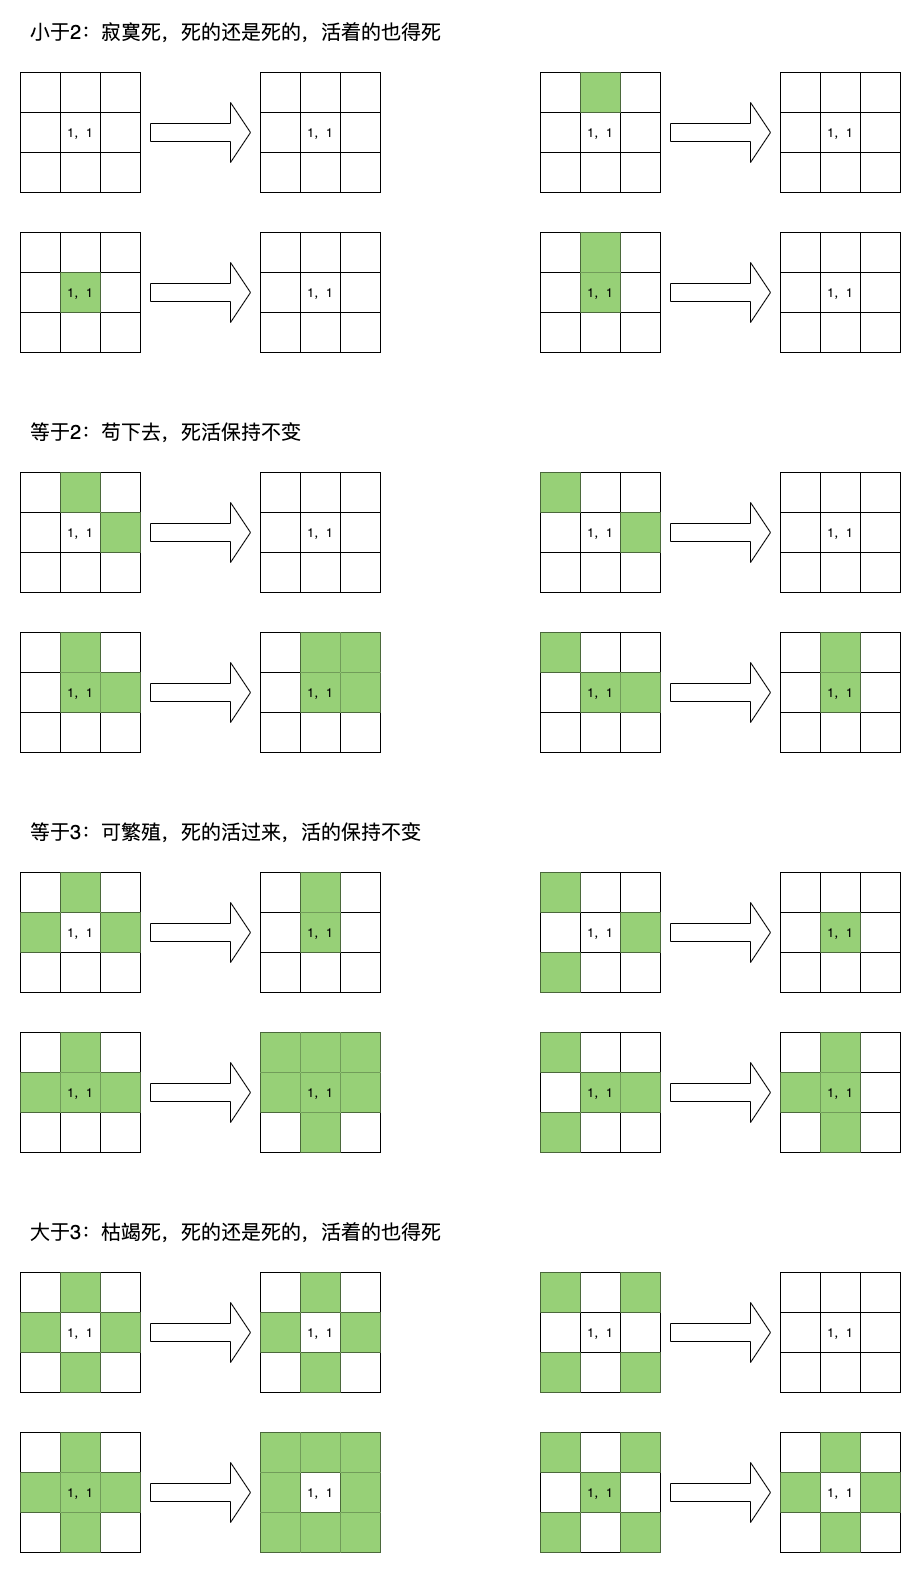
根据规则,在一次转换中,一个细胞按以下规则决定生死:
- 周围活的细胞小于2,则当前细胞是死的。
- 周围活的细胞等于2,则当前细胞保持不变。
- 周围活的细胞等于3,则当前细胞是活的。
- 周围活的细胞大于3,则当前细胞是死的。
由于列了如下测试用例。

以 1,1 为关注点,验证周围存活细胞数量对 1,1 的影响。由于规则就是周围的细胞决定了当前细胞的生死,所以列这些用例的主导思路就是靠近有影响的情况与尽量拉开,减少互相影响的情况。
任务拆分与设计
按照张逸老师《解构领域驱动设计》中业务服务层次的拆分指导进行服务(任务)拆分。
- 用例:初始化
1.1. 指定图形进行初始化(指定数组)
1.2. 指定行数列数进行初始化(细胞状态随机) - 用例:翻转一次
2.1. 依次遍历每一个细胞
2.2. 获取细胞周围存活的细胞数
2.2.1. 确定两个细胞是否相邻
2.3. 当前细胞根据周围存活数及自己原来的状态翻转出新细胞 - 用例:获取当前细胞状态(以数组方式呈现)
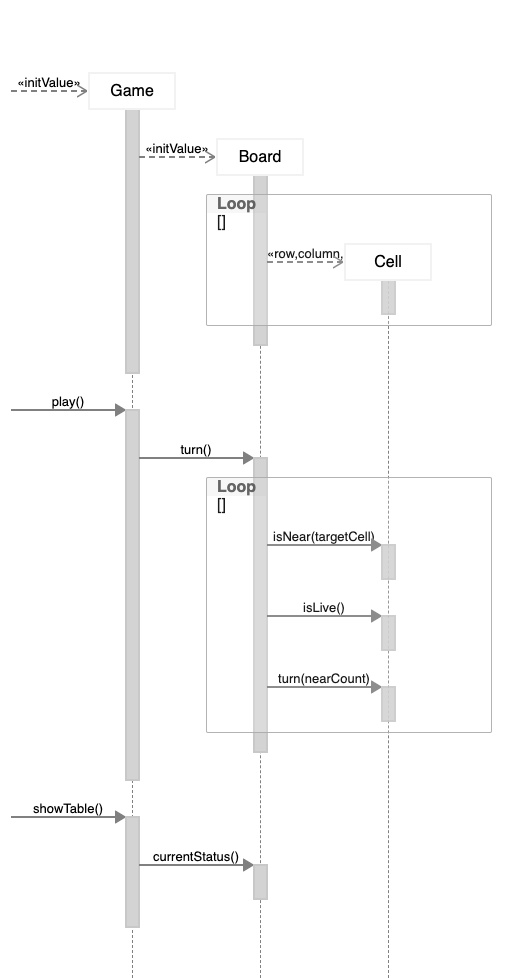
以上面的拆分为基础,经过简单设计后,得到以下序列图。

ZenUML还不是太会用,上面的序列图仅是个示意。主要想表达的是 Game、Board、Cell 是设计出来的,不是测试驱动出来的,在写代码之前,已经进行了类的定义,职责的划分。
每个 Cell,主要具备两个职责,一个是判断是否与另外一个 Cell 相邻,另一个是根据当前 live 状态及传入的相邻存活数,翻转出一个新的 Cell。
Board 下有一个 Cell 集合,每当翻转时,就遍历这个集合,取每一个 Cell,再从集合里计算出与 Cell 相邻的存活的数量,促使 Cell 完成翻转。
TDD
正式开始开发,根据前面的梳理设计,从 Cell 开始入手。重点是以下二点:
- isNear:判断两个 Cell 是否相邻
- turn:根据当前 live 状态与传入的相邻存活数,创建新的 Cell
isNear
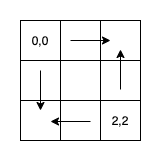
刚开始写测试时,比较随意,准备以 1,1 为基础的 4 个方向进行测试,虽说没有大错,而且与最终的测试方法相近,但在写时显得相当混乱,最终停下来,在纸上画了下图,确定了测试的方向与步骤。

这再次说明,无论哪个层级,还都是需要谋定而后动的,不是到哪算哪的那种。
最终测试代码如下:
@Test
public void cell_0_1_isNear_cell_0_0() {
    Cell originCell = new Cell(0, 0, true);
    Cell targetCell = new Cell(0, 1, true);

    Assert.assertTrue(originCell.isNear(targetCell));
}

@Test
public void cell_0_2_isNotNear_0_0() {
    Cell originCell = new Cell(0, 0, true);
    Cell targetCell = new Cell(0, 2, true);

    Assert.assertFalse(originCell.isNear(targetCell));
}

@Test
public void cell_1_0_isNear_cell_0_0() {
    Cell originCell = new Cell(0, 0, true);
    Cell targetCell = new Cell(1, 0, true);

    Assert.assertTrue(originCell.isNear(targetCell));
}

@Test
public void cell_2_0_isNotNear_0_0() {
    Cell originCell = new Cell(0, 0, true);
    Cell targetCell = new Cell(2, 0, true);

    Assert.assertFalse(originCell.isNear(targetCell));
}

@Test
public void cell_2_1_isNear_cell_2_2() {
    Cell originCell = new Cell(2, 2, true);
    Cell targetCell = new Cell(2, 1, true);

    Assert.assertTrue(originCell.isNear(targetCell));
}

@Test
public void cell_2_0_isNotNear_cell_2_2() {
    Cell originCell = new Cell(2, 2, true);
    Cell targetCell = new Cell(2, 0, true);

    Assert.assertFalse(originCell.isNear(targetCell));
}

@Test
public void cell_1_2_isNear_cell_2_2() {
    Cell originCell = new Cell(2, 2, true);
    Cell targetCell = new Cell(1, 2, true);

    Assert.assertTrue(originCell.isNear(targetCell));
}

@Test
public void cell_0_2_isNotNear_cell_2_2() {
    Cell originCell = new Cell(2, 2, true);
    Cell targetCell = new Cell(0, 2, true);

    Assert.assertFalse(originCell.isNear(targetCell));
}
当这几个测试通过后,我突然意识到存在一个 Bug,就是同一个Cell是不能相邻的。这里就体现出 TDD 的优势来,这种细小的差异在平时的开发中其实是很难发觉的。使用 TDD 的开发思路,一是就像现在这样,在开发时容易发现问题,二是在后期修改时,有了测试的护航,不容易改坏原有的逻辑。
@Test
public void cell_0_0_isNotNear_cell_0_0() {
    Cell originCell = new Cell(0, 0, true);
    Cell targetCell = new Cell(0, 0, true);

    Assert.assertFalse(originCell.isNear(targetCell));
}
当然,如果不是现在这个阶段发现也不是问题,在后面的开发应用中,自然会浮现,或者甚至是交付应用后发现,到时针对问题补上测试即可。所以说,TDD 的价值是提高了代码的质量,系统的健壮性,而不是追求代码覆盖率。
turn
这里主要就是根据业务规则的定义,计算新 Cell 的 live 状态。
@Test
public void cell_turn_when_cell_is_dead_and_near_count_less_two_then_cell_is_dead() {
    Cell originCell = new Cell(0,0, false);

    Cell newCell = originCell.turn(1);

    Assert.assertTrue(newCell.isDead());
}

@Test
public void cell_turn_when_cell_is_live_and_near_count_less_two_then_cell_is_dead() {
    Cell originCell = new Cell(0,0, true);

    Cell newCell = originCell.turn(1);

    Assert.assertTrue(newCell.isDead());
}

@Test
public void cell_turn_when_cell_is_dead_and_near_count_equals_two_then_cell_is_dead() {
    Cell originCell = new Cell(0,0, false);

    Cell newCell = originCell.turn(2);

    Assert.assertTrue(newCell.isDead());
}

@Test
public void cell_turn_when_cell_is_live_and_near_count_equals_two_then_cell_is_live() {
    Cell originCell = new Cell(0,0, true);

    Cell newCell = originCell.turn(2);

    Assert.assertTrue(newCell.isLive());
}

@Test
public void cell_turn_when_cell_is_dead_and_near_count_equals_three_then_cell_is_live() {
    Cell originCell = new Cell(0,0, false);

    Cell newCell = originCell.turn(3);

    Assert.assertTrue(newCell.isLive());
}

@Test
public void cell_turn_when_cell_is_live_and_near_count_equals_three_then_cell_is_live() {
    Cell originCell = new Cell(0,0, true);

    Cell newCell = originCell.turn(3);

    Assert.assertTrue(newCell.isLive());
}

@Test
public void cell_turn_when_cell_is_dead_and_near_count_greater_three_then_cell_is_dead() {
    Cell originCell = new Cell(0,0, false);

    Cell newCell = originCell.turn(4);

    Assert.assertTrue(newCell.isDead());
}

@Test
public void cell_turn_when_cell_is_live_and_near_count_greater_three_then_cell_is_dead() {
    Cell originCell = new Cell(0,0, true);

    Cell newCell = originCell.turn(4);

    Assert.assertTrue(newCell.isDead());
}
Board
当 Cell 能确定相邻关系及根据相邻存活数生成新 Cell 时,剩下的就变得非常简单了。Board 的 turn 也无需,甚至无法通过测试一步步驱动出自身逻辑了。根据前面的验收测试图,写一个验收测试,turn 的逻辑便跟着写完了。
第一个验收测试:
@Test
public void less_two_case_1() {
    Board board = new Board(new String[][]{
            {"O", "O", "O"},
            {"O", "O", "O"},
            {"O", "O", "O"}
    });

    board.turn();

    String[][] result = board.currentStatus();

    Assert.assertArrayEquals(result, new String[][]{
            {"O", "O", "O"},
            {"O", "O", "O"},
            {"O", "O", "O"}
    });
}
turn:
public void turn() {
    cells = cells.stream()
            .map(cell -> cell.turn((int)cells.stream().filter(targetCell->targetCell.isLive() && cell.isNear(targetCell)).count()))
            .collect(toList());
}
最后,根据验收测试图的罗列,补齐测试,一切顺利通过。
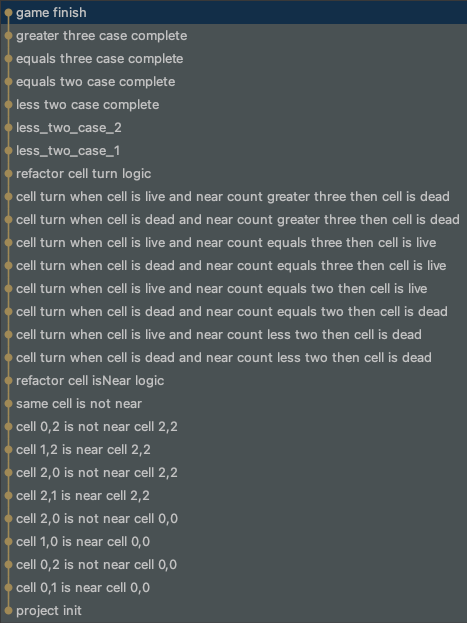
TDD的好习惯,每一个用例都足够小,每通过一个用例都做Git提交,回头看提交记录,也是非常有意思的。

项目地址
完整代码:Game of life
总结
在开篇时的三个问题,结合这次的实践,总结如下:
- TDD 不设计
TDD 不该是上手直接撸代码,走哪算哪的过程。一个练习尚且需要梳理设计,何况是一个项目。
另外,不同的阶段需要使用不同的方法,TDD 适合于在一个设计过的项目中,针对某一段具体业务逻辑的代码的编写。应用 TDD 可以有效保证逻辑的正确性,也可验证设计的合理性。 - 不关注其它资源约束,如时间
当确定了 TDD 的适用范围,明确了不该以覆盖率为目标,时间资源确实不是 TDD 需要考虑的问题。从需求分析梳理设计到拆分成任务,开发时间必定做了预估,而 TDD 只是这个任务采用的开发手段,任务本身当然需要符合时间约束。
- 写到哪算哪
当有了设计后,TDD 便被控制在一个特定的范围内。这次 TDD 实践,以 Cell 为重点入手,Board 使用的是验收测试,Game 无测试,说明了根据设计与项目需要,对 TDD 这种方式及测试有意识的选择。