每一件美好的事情,开始都是困难的。——斯宾塞
Cartisan 是我五六年前取的名字,那时老罗刚开始搞手机,叫 Smartisan,我一直比较认同他提的一些价值观,所以就依葫芦画瓢,取了个 Cartisan,Code artisan,意为代码工匠。
我在【开篇】里说过,我要做一个系统,把自己学习的知识串起来,积累成一个产品,并且把这个过程通过博客的方式记录下来。
以前根据自己的工作情况,想写过不少类型的系统。我现在选择做一个电商系统,一是因为电商业务大家都比较了解,技术覆盖面够广,二是在开源社区有比较成熟的系统可参考。
现阶段业务逻辑主要参考 mall。
Cartisan 实践清单
根据我个人学习掌握的知识,我将在 Cartisan 上做以下实践,且不限于列表中的技术。
- 实例化需求
- 领域驱动设计
- 测试驱动开发
- 分布式、微服务系统架构
- DevOps
架构
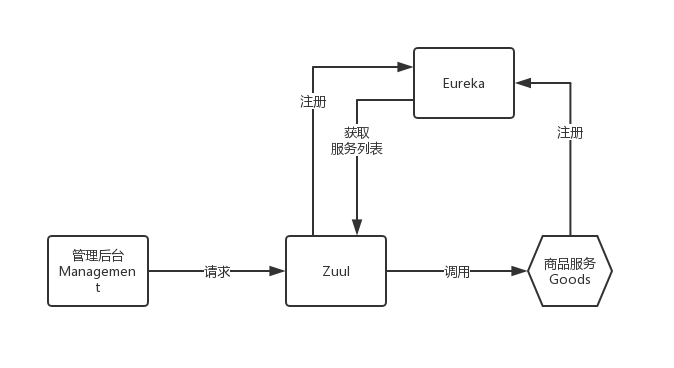
Cartisan 将使用前后端分离的架构,这个架构图我会在后面的开发过程中不断演化丰富。
现在的结构非常简单,管理后台向 Zuul 做的网关发送对商品服务的请求,Zuul 本身注册在 Eureka 做的注册中心上,并且从注册中心获取注册的服务列表,然后把请求转发给商品服务。
行走的骨架
程序员很多时候被称作 CRUD boy 不是没理由的,毕竟大多业务就是简单的 CRUD。
这里以商品品牌维护为例,通过简单的 CRUD,来走通这个简单的架构思路。目的有二:
- 不管简单或复杂,系统先得跑起来,才能不断演化。
- 从系统展现到服务逻辑实现,大部分功能就可以通过这种模式化的方式,实现快速开发。
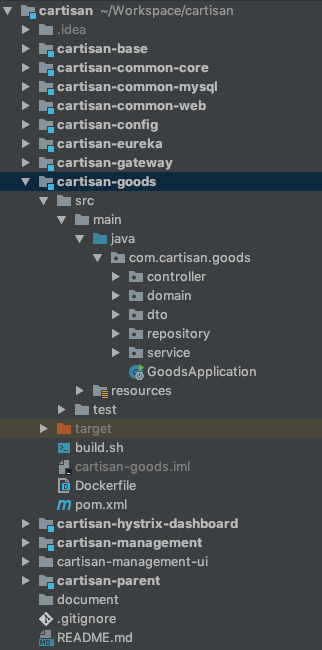
common-core、common-mysql、common-web 三个是 Cartisan 的基础库,一些通用的类,框架层面的基类、持久化处理、日志等等都在这里,每一个以后都单独整理说明。
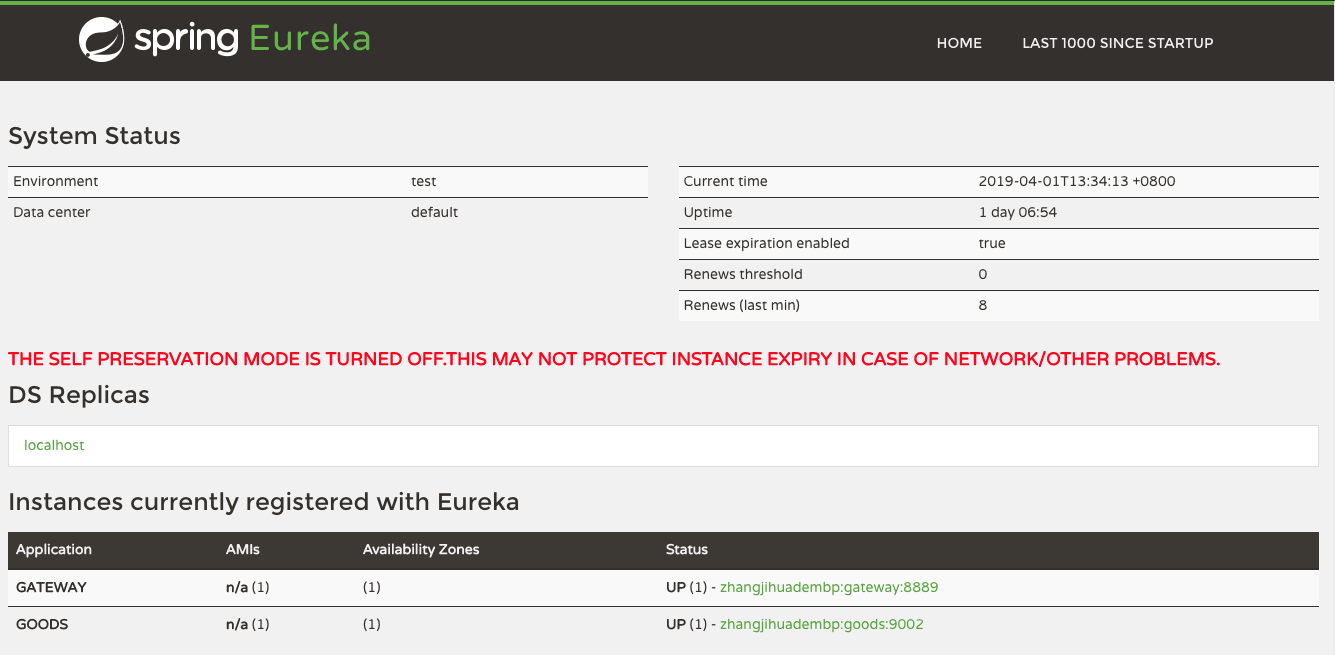
Zuul 做的网关和商品服务都会向 Eureka 注册,这样就可以通过网关地址在服务名称完成对服务的访问。
后端服务
pom.xml
pom 文件比较简单,根据业务场景,引入对应的基础库,基础库已经包含了所有要使用的其它依赖。
    <dependencies>
        <!-- cartisan 基础库 -->
        <dependency>
            <groupId>com.cartisan</groupId>
            <artifactId>cartisan-common-web</artifactId>
            <version>1.0-SNAPSHOT</version>
            <scope>compile</scope>
        </dependency>

        <dependency>
            <groupId>com.cartisan</groupId>
            <artifactId>cartisan-common-mysql</artifactId>
            <version>1.0-SNAPSHOT</version>
            <scope>compile</scope>
        </dependency>
    </dependencies>
应用入口
每个服务都是基于 Spring boot、Spring cloud 构建,CartisanApplication 是基于这两者构建基类,减少应用的重复配置及扫描基础库。
public class GoodsApplication extends CartisanApplication {
    public static void main(String[] args) {
        SpringApplication.run(GoodsApplication.class);
    }

    @Bean
    public IdWorker idWorker() {
        return new IdWorker(1, 1);
    }

    @Bean
    public BCryptPasswordEncoder bCryptPasswordEncoder() {
        return new BCryptPasswordEncoder();
    }
}
@SpringCloudApplication
@ComponentScan(value = "com.cartisan.common")
public class CartisanApplication extends SpringBootServletInitializer {
    @Override
    protected SpringApplicationBuilder configure(SpringApplicationBuilder application) {
        return application.sources(this.getClass());
    }

    @Bean
    public ServletRegistrationBean hystrixStreamServlet() {
        final HystrixMetricsStreamServlet hystrixMetricsStreamServlet = new HystrixMetricsStreamServlet();
        final ServletRegistrationBean<HystrixMetricsStreamServlet> registrationBean =
                new ServletRegistrationBean<>(hystrixMetricsStreamServlet);
        // 系统启动时的加载顺序
        registrationBean.setLoadOnStartup(1);
        registrationBean.addUrlMappings("/hystrix.stream");
        registrationBean.setName("HystrixMetricsStreamServlet");

        return registrationBean;
    }
}
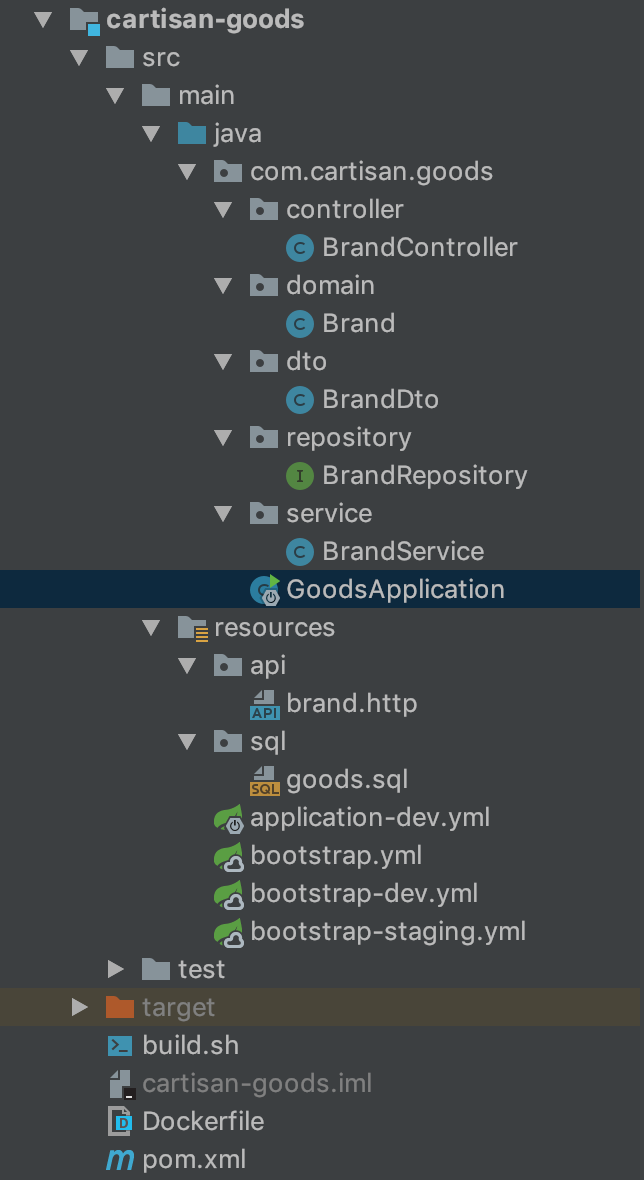
resources
- 配置
每个服务的配置,都根据生产、测试、开发等环境进行拆分。bootstrap 的配置是最优先加载的,所以使用 bootstrap 可以很好解决当使用配置中心时,对配置中心的配置及优先于配置中心的配置。
- SQL
微服务或者说一个限界上下文都应该独立的数据库,所以把每个服务的建库建表及初始化语句单独存放。
- api 测试
服务最重要的一点是测试,一般可以使用 PostMan,但访问请求的管理是个问题。IDEA 的 HttpClient 插件很好的解决了这个问题,把请求保存到一个 .http 文件中,在 IDEA 中就可以直接完成请求测试。
### 获取所有品牌列表
GET http://localhost:9002/brands
Accept: application/json
Content-Type: application/json;charset=UTF-8

### 获取品牌
GET http://localhost:9002/brands/1
Accept: application/json
Content-Type: application/json;charset=UTF-8

### 搜索品牌(不带参数)
GET http://localhost:9002/brands/search/1/10
Accept: application/json
Content-Type: application/json;charset=UTF-8

### 搜索品牌
GET http://localhost:9002/brands/search/1/10?name=car
Accept: application/json
Content-Type: application/json;charset=UTF-8

### 添加品牌
POST http://localhost:9002/brands
Accept: application/json
Content-Type: application/json;charset=UTF-8

{
  "name": "cartisan",
  "firstLetter": "C",
  "isManufacturer": true,
  "isShow": true,
  "logo": "logo",
  "bigPic": "bigPic",
  "sort": 100
}

### 修改车型
PUT http://localhost:9002/brands/11
Accept: application/json
Content-Type: application/json;charset=UTF-8

{
  "name": "cartisan",
  "firstLetter": "C",
  "isManufacturer": true,
  "isShow": true,
  "logo": "logo1",
  "bigPic": "bigPic1",
  "sort": 100
}

### 删除车型
DELETE http://localhost:9002/brands/11
Accept: application/json
Content-Type: application/json;charset=UTF-8

###
领域模型与仓储
一般情况下领域模型承担了 DO 与 PO 的职责。ORM 选用 JPA 自带的 Hibernate 来完成。AbstractEntity 提供了常用的创建、更新时间的记录及软删除的支持。
@Entity
@Table(name = "goods_brands")
@Where(clause = "active=1 and deleted=0")
@Data
public class Brand extends AbstractEntity {
    @Id
    @Column(name = "id")
    @GeneratedValue(strategy = GenerationType.IDENTITY)
    private Long id;

    @Column(name = "name")
    private String name;
    @Column(name = "first_letter")
    private String firstLetter;
    @Column(name = "is_manufacturer")
    private Boolean isManufacturer;
    @Column(name = "is_show")
    private Boolean isShow;
    @Column(name = "logo")
    private String logo;
    @Column(name = "big_pic")
    private String bigPic;
    @Column(name = "sort")
    private Long sort;
}
public interface BrandRepository extends BaseRepository<Brand, Long> {
}
Service 与 Dto
服务一般以 Dto 作返回值,简单情况下,增改直接使用 Dto 传入,复杂业务场景,可以专门定义请求的 Parameter 对象。
@Service
public class BrandService {
    @Autowired
    private BrandRepository repository;

    public List<BrandDto> findAllBrands() {
        final List<Brand> brands = repository.findAll();
        return brands.stream().map(BrandDto::convertFrom).collect(Collectors.toList());
    }

    public BrandDto getBrand(Long id) {
        return BrandDto.convertFrom(repository.findById(id).get());
    }

    public PageResult<BrandDto> searchBrands(String name, Integer currentPage, Integer pageSize) {
        PageRequest pageRequest = PageRequest.of(currentPage - 1, pageSize,
                new Sort(Sort.Direction.DESC, "sort"));

        final Page<Brand> searchResult = repository.findAll((Specification<Brand>) (root, query, criteriaBuilder) -> {
            List<Predicate> predicateList = new ArrayList<>();

            if (StringUtils.isNotBlank(name)) {
                predicateList.add(criteriaBuilder.like(root.get("name"),
                        "%" + name + "%"));
            }

            return criteriaBuilder.and(predicateList.toArray(new Predicate[predicateList.size()]));
        }, pageRequest);

        return new PageResult<>(searchResult.getTotalElements(),searchResult.getTotalPages(),
                searchResult.map(BrandDto::convertFrom).getContent());
    }

    @Transactional(rollbackOn = Exception.class)
    public void addBrand(BrandDto brandDto) {
        final Brand brand = new Brand();
        BeanUtils.copyProperties(brandDto, brand);

        if (StringUtils.isEmpty(brand.getFirstLetter())) {
            brand.setFirstLetter(brand.getName().substring(0, 1));
        }

        repository.save(brand);
    }

    @Transactional(rollbackOn = Exception.class)
    public void editBrand(Long id, BrandDto brandDto) {
        final Brand brand = repository.findById(id).get();
        BeanUtils.copyProperties(brandDto, brand);
        brand.setId(id);

        if (StringUtils.isEmpty(brand.getFirstLetter())) {
            brand.setFirstLetter(brand.getName().substring(0, 1));
        }

        // TODO: 更新品牌时要更新商品中的品牌名称

        repository.save(brand);
    }

    @Transactional(rollbackOn = Exception.class)
    public void removeBrand(long id) {
        repository.deleteById(id);
    }
}
Controller
Controller 统一使用 Restful 风格,每个接口包括参数,都打上 Swagger 的 annotation,便于生成接口文档。
@Api(tags = "BrandController", description = "商品品牌管理")
@RestController
@RequestMapping("/brands")
public class BrandController {
    @Autowired
    private BrandService service;

    @ApiOperation(value = "获取所有品牌列表")
    @GetMapping
    public GenericResponse<List<BrandDto>> findAllBrands() {
        return success(service.findAllBrands());
    }

    @ApiOperation(value = "获取品牌")
    @GetMapping("/{id}")
    public GenericResponse<BrandDto> getBrand(
            @ApiParam(value = "品牌Id", required = true) @PathVariable Long id) {
        return success(service.getBrand(id));
    }

    @ApiOperation(value = "搜索品牌")
    @GetMapping("/search/{currentPage}/{pageSize}")
    public GenericResponse<PageResult<BrandDto>> searchBrands(
            @RequestParam(required = false) String name,
            @PathVariable Integer currentPage,
            @PathVariable Integer pageSize) {
        return success(service.searchBrands(name, currentPage, pageSize));
    }

    @ApiOperation(value = "添加品牌")
    @PostMapping
    public GenericResponse addBrand(
            @ApiParam(value = "品牌信息", required = true) @RequestBody BrandDto brandDto) {
        service.addBrand(brandDto);

        return success();
    }

    @ApiOperation(value = "更新品牌")
    @PutMapping("/{id}")
    public GenericResponse editBrand(
            @ApiParam(value = "品牌Id", required = true) @PathVariable Long id,
            @ApiParam(value = "品牌信息", required = true) @RequestBody BrandDto brandDto) {
        service.editBrand(id, brandDto);

        return success();
    }

    @ApiOperation(value = "删除品牌")
    @DeleteMapping("/{id}")
    public GenericResponse removeBrand(
            @ApiParam(value = "品牌Id", required = true) @PathVariable long id) {
        service.removeBrand(id);

        return success();
    }
}
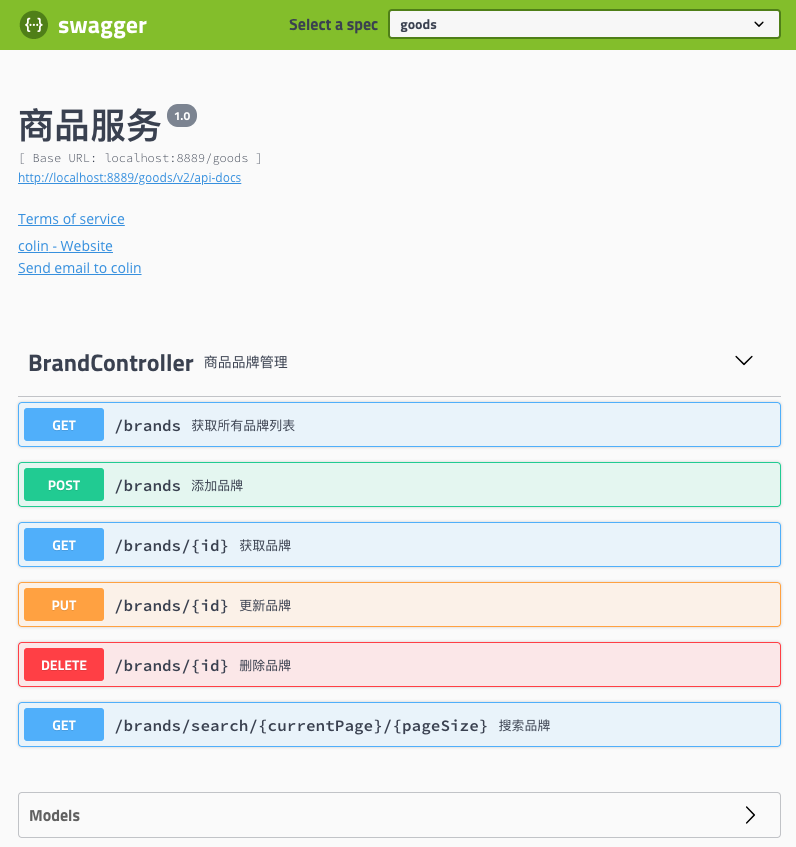
前端(管理后台)
管理后台使用强大的 vue-element-admin 做模板。
Api
为每个后台服务创建一个使用 axios 进行远程访问的服务代理。访问服务的基地址就是网关提供的地址。
module.exports = {
  NODE_ENV: '"development"',
  ENV_CONFIG: '"dev"',
  // BASE_API: '"https://api-dev"'
  BASE_API: '"http://localhost:8889"'
}
import request from '@/utils/request';

export function searchBrands(currentPage, pageSize, params) {
  return request({
    url: `/goods/brands/search/${currentPage}/${pageSize}`,
    method: 'get',
    params: params
  });
}

export function findAllBrands() {
  return request({
    url: '/goods/brands',
    method: 'get'
  });
}

export function getBrand(id) {
  return request({
    url: `/goods/brands/${id}`,
    method: 'get'
  });
}

export function addBrand(params) {
  return request({
    url: '/goods/brands',
    method: 'post',
    data: params
  });
}

export function editBrand(id, params) {
  return request({
    url: `/goods/brands/${id}`,
    method: 'put',
    data: params
  });
}

export function removeBrand(id) {
  return request({
    url: `/goods/brands/${id}`,
    method: 'delete'
  });
}
路由
为了便于管理,每个模块使用单独的配置文件。不需要显示到菜单上的,配置 hidden: true。
import Layout from '@/views/layout/Layout';

const goods = {
  path: '/goods',
  component: Layout,
  redirect: '/goods/brand',
  name: 'Goods',
  meta: {
    title: '商品',
    icon: 'clipboard'
  },
  children: [
    {
      path: 'brand',
      name: 'Brand',
      component: () => import('@/views/goods/brands'),
      meta: { title: '品牌管理' }
    },
    {
      path: 'brandAdd',
      name: 'BrandAdd',
      component: () => import('@/views/goods/brandAdd'),
      meta: { title: '添加品牌' },
      hidden: true
    },
    {
      path: 'brandEdit',
      name: 'BrandEdit',
      component: () => import('@/views/goods/brandEdit'),
      meta: { title: '编辑品牌' },
      hidden: true
    }
  ]
};

export default goods;
页面
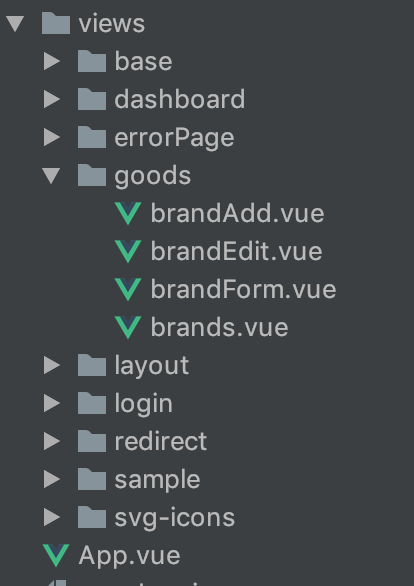
页面统一建立在 views 目录下,一般的 CRUD,可以模式化地建成列表、新增、更新及一个表单组件。
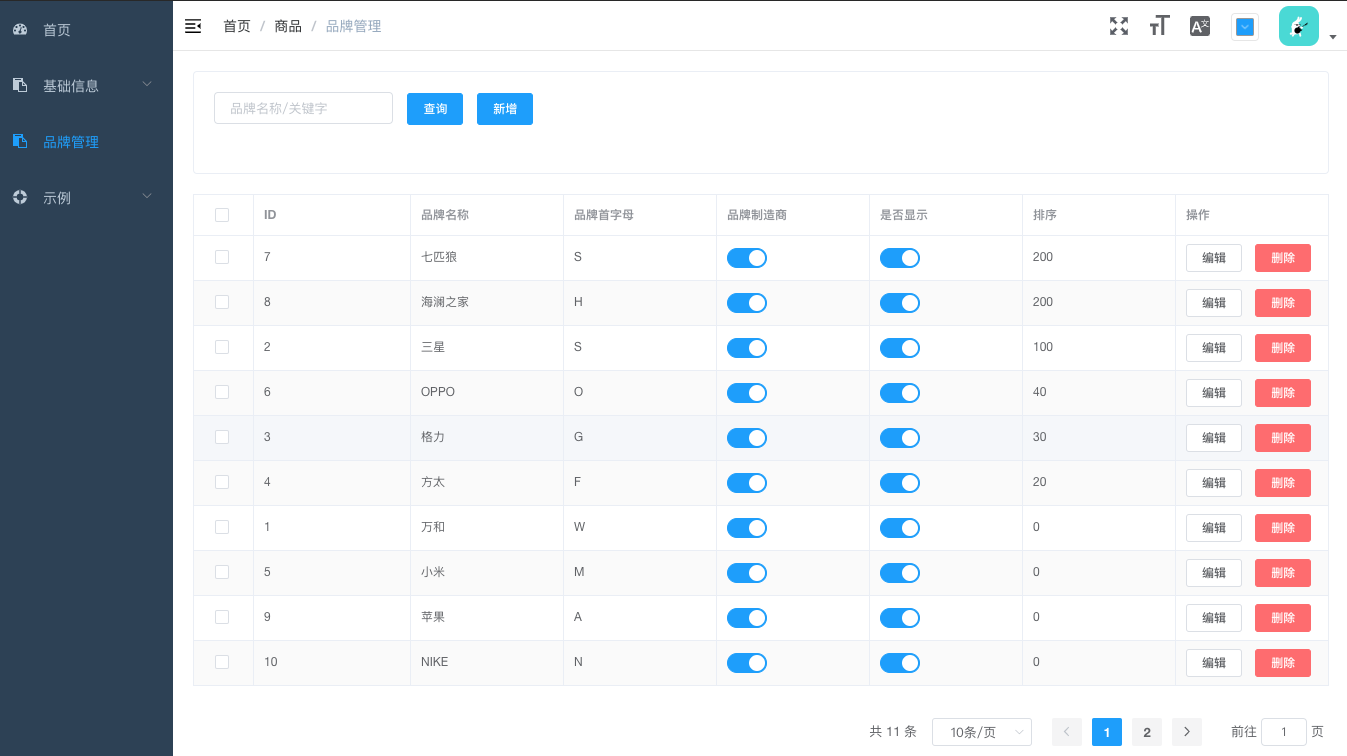
运行效果
- 列表页
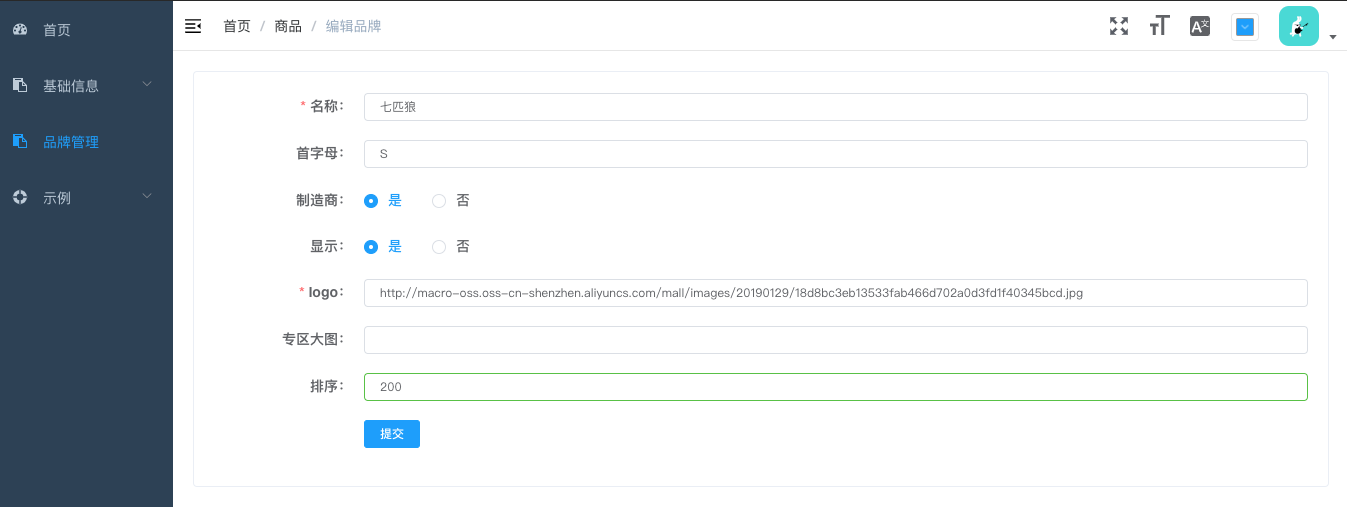
- 编辑页
总结
至此,一个简单的前后端分离的系统就搭建完成了。对于简单的一些业务功能,完全可以套用这样的结构快速完成。
当然,在基础库及系统流程上还需要不断完善增强,包括领域驱动在代码层面的落地,分布式架构下各种问题的应对,后面会一步步改进。